A couple of months ago I guest posted an article about How To Make Printable Recipes Pages on Food Bloggers Unite and I liked the idea of food blogging how to posts. I wanted to start posting the how to food blogging posts right away but things got busy and it fell to the way side. For those of you that visit Closet Cooking regularly you may have noticed that I change my header image every couple of weeks and I was just about to change it again when I thought that it would be a nice way to start my how to food blogging posts. So today I will not be posting a recipe but rather a how to tutorial on creating a food blog header.
The first step in creating a foodie header for your blog is taking a picture of some food. The thing to keep in mind when taking your photo is that you are going to want to have text on top of the image and you want to be able to see the text. This means that you want an area of the photo that is not busy, a nice and simple area where the text will be visible. I like to try to take my header image photos on a white background so that the text can go over the white area and be clearly visible.
Once you have taken the photo, upload it to your computer and do any post processing that you want such as correcting the white balance or the exposure, etc.
Since I have been enjoying the fresh local cherries lately I decided to do a cherry header and the image above is what I started with after post processing.
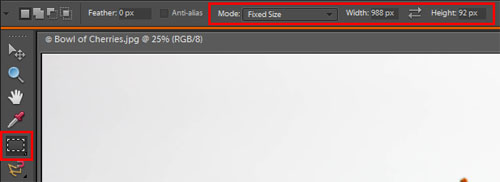
Next you want to figure out how big your header image is if you already have one or decide how big you want it to be. My header image is 988 pixels wide by 92 pixels high so I will use those dimensions in this example. Open the photo in Photoshop or Elements and select the Rectangular Marquee Tool. Change the mode to fixed size and place the header image dimensions in the Width and Height fields like this:

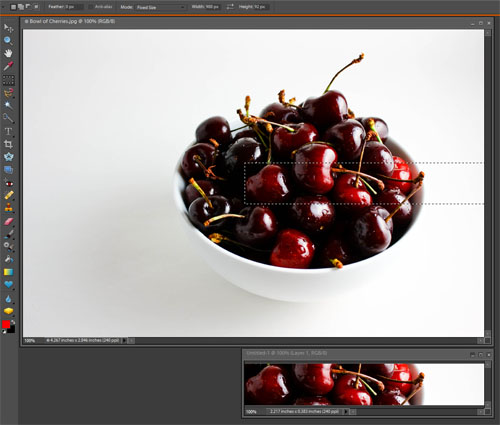
After you have set the dimensions when you click on the image a box the size of the dimensions that you entered will appear where you clicked. Whatever is in the box will become your header image. Normally the photo is much bigger than the header image so you are going to need to resize the photo and try to select what you want to appear in your header image. I usually have to resize the photo a few times until I get it just right. Below is a screenshot of what I selected.

Once you have selected the part of the photo that you want to be your header image you can hit Ctrl + C to copy the selected area followed by Ctrl + N to open a new file followed by clicking on OK followed by Ctrl + V to paste the selected image into the new file followed by Ctrl + S to save it. At this point you are normally done and you can upload the image to your blogs header. (See below for instructions to upload the header image to blogger.)
I ran into a problem here in that when I selected what I wanted to be in my header image there was not enough room on the right and my header image was only 532 pixels wide when I needed 988 pixels. Not to worry there is a solution: I hit Ctrl + C to copy the selected area followed by Ctrl + N to open a new file.

I changed the width to 988 pixels followed by OK and Ctrl + V to paste the selected image into the new one as follows:

I now had the image above which wasn't really what I wanted either. So I selected the Rectangular Marquee Tool again and set the dimensions to the cut images size which was 532 pixels by 92 pixels and I selected the pasted image and hit Ctrl + X to cut the image and dragged the selected area to the far left and hit Ctrl + V to paste the image.

Now I had a header image that was left justified but there was a line where the background of the photo ran out. This was easily fixed by selecting the Eydropper Tool and clicking on an area of the off white background from the photo and then selecting the Paint Bucket Tool and clicking on the perfectly white background of the new image to fill it with the same colour as the photos background. Then I just needed to save the file by hitting Ctrl + S followed by changing the file format to jpg and saving it.
I finally had my finished background image and all that was left was to upload it to blogger.
Note: If you do not have a nice solid background colour you could also add a new layer and add a gradient to fade out the image to white so that your header text is visible over the faded area.
How to upload the header image to Blogger:
Log on to Blogger and go to the Layout tab -> Click on the Edit link in the Header area -> Remove the old image if you have one -> Click the From your computer -> Browse and select the image header file followed by Save after it has been uploaded. You now have your header image.
The only issue that might remain is where your header text is. If the header text is centered or above the image part of the header image rather than the area that you set aside for the text then you will need to edit the HTML of your blogs template and set the header text to "text-align:right;" or "text-align:left;" as appropriate. Each template is different but for mine I had to edit the "#header h1" and the "#header .description" styles.
This post took a lot more effort to write than a recipe post! I hope that you find it useful. Please left me know by leaving a comment if you would like me to continue to post food blogging how to's in the future or if you would prefer that I just got to the food.
No comments:
Post a Comment